Wednesday, December 28, 2011

Best Wishes with my old jeans!


Hello! I hope your Christmas was fantastic! I am still up in a cabin in Idaho so this is pre-posted for your delight! :) 

Pop on by Shop Pumpkin Spice to get more inspiration all week long! 

I ripped my jeans and didn't want them to be a total loss, so I turned them into this card! 

The sunlight was so harsh on this card, but hopefully you still get the gist. 


Recipe:
Cartridge: Everyday Pop-up Cards
Patterned Paper: Crate Paper Random 6x6 paper pad
Buttons from my stash and twine from my stash.


SHARE THIS POST - {PINTEREST}

Thursday, December 22, 2011

My Pink Stamper: 12 Days of Christmas!

Hello and welcome to My Pink Stamper's 12 day's of Christmas! The Pink Designers have been making projects for you all week long and are hoping we can inspire you to play along in the challenges to possibly win a CRICUT MINI! That's right! And there are other prizes every day! Check it out! 

I have the 22nd and I hope you like my super quick and easy project! 

In the move, I don't know where my video camera went, so I filmed this with my iPhone and my husband was holding it! So I'm so sorry it's not the best quality, but I still think you can get it! :) 

If you want directions on how to make the bow that are written, click HERE for my post I did like this last year. :) 


Recipe:
My Pink Stamper: Winter Treats and Sayings
Vellum paper: Paper Trey Ink™
Patterned Paper: Echo Park: Holly Jolly
Glue Arts Extreme Adhesive Squares™
ATG
Colorbox ink in Black™


OH! The Christmas tradition! Each person in the family gets assigned another person (in Hans's nuclear family) and we get them a "funny gift". We then have to write a poem about it and from the poem the person has to guess what their gift is. For instance Hans' little brother had just been accepted into a hedge fund in Boston a few years ago. So we made him a hedge hog out of an orange with cloves stuck in it and a little curly tail and we wrote about both. So it has to do with both your life and what's going on and something completely ridiculous. It's pretty "punny". 

SHARE THIS POST - {PINTEREST}

Wednesday, December 21, 2011

Merry Christmas

Merry Christmas everyone! I hope all of your shopping is done! :) I'm in Idaho right now and we are hoping for more snow!!! :) 

This is my Shop Pumpkin Spice post for this fabulous Wednesday. :) 

Recipe:
Cartridge: Paper Trimmings™ (Cricut Circle Exclusive)
Sentiment: My Pink Stamper: Biggie Christmas
Patterned Paper: Echo Park Times and Seasons
Clear Snap Glue Gloss (what I used to draw the lines to put the glitter on)
White Gel Pen
Denim Twine from the Twinery
Foam Dimensional Tape by Imaginisce in White™
Ink: Momento in Rich Cocoa and Colorbox in Black (I need a new black desperately! haha)
Crinkled Ribbon: Kris Swain's Etsy Store in Old Navy (LOVE this color! Let her know I sent you please!)
Glitter: Martha Stewart Tinsel Glitter™

SHARE THIS POST - {PINTEREST}

Monday, December 19, 2011

Snowman Soup

WOO HOO! Welcome to the Imaginisce/Clear Snap blog hop! The hop is just between the two manufacturers so please head over to both of their blogs as well for some great PRIZE opportunities!


My husband thought this card was snowman cruelty! haha. Oh well! I loved it! :) 

We just drove from San Francisco to Salt Lake City in a day! We were SO exhausted last night I basically collapsed into bed. Today we will pick up his brother from the airport and head north to Idaho. We don't really have much internet or phone reception there so I will probably not be able to get back to any of you in comments, but I will try! If I can't, I'll see you after New Years! We are moving into a house in Carmel and I will have a craft room!!! WOO HOO!!! 


Recipe:


This was all the product that Clear Snap sent to me! Thank you! I was able to use all but the Glue Gloss and the green Sparkle Fibers on this project. However, I did work in the Glue Gloss in an upcoming project! :) Check back on Wednesday for that! :) THANK YOU Clear Snap! 


This is another view so that you can see how the card really sparkles! 

Don't forget to hop on over to Clear Snap and Imaginisce (links at the top) to check out what all the girls have made! 


I based this on a sketch by Artful Delight:


SHARE THIS POST - {PINTEREST}

Wednesday, December 14, 2011

Sydney's Shadow Box

Hello and good Wednesday morning to you! I am here to share my Pumpkin Spice post of the day! 

This was made for my six year old niece (well technically my 2nd cousin, but we're more like sisters). I decided I wanted to make her something for her room so I used her monogram to make this shadow box wall hanging! It's my first one and I hope you like it! :)

The light was so wrong to take these photos, but I did my best! 


 I used my Xyron to glitter the vellum butterfly wings.


Recipe:


I also made this for the My Mind's Eye Sketch Challenge. I'm not sure they will let it in since it isn't a "card", but I made it from this sketch so it should still be credited! :) 


SHARE THIS POST - {PINTEREST}

Tuesday, December 13, 2011

New Collection By Imaginisce: Hippity Hop!

Welcome to the release party of Hippity Hop! This may be my most favorite collection YET! Over at Imaginisce, we are having a splendid time playing with it, inspiring you and... yes... giving some away! Check out how you can win something over HERE!


When we got the sneak peeks of this collection, the girls sweetly teased "I see Courtney making a shaped bunny card with this collection". Ugh! They know me so well! I LOVE those girls!!! So here it is in all it's bunny glory! :) 


Recipe:


--------------------

I know I know, it's shocking, but I actually did a card 
a: without the Cricut
b: clean and simple
c: PAPER PIECED! 
I saw this stamp and IMMEDIATELY knew I wanted to do this with it. I am so glad it turned out about the same way as it did in my head. :)

I was super inspired to paper piece by my DTmate and sweet friend (and now DT leader for Imaginisce) Cari Locken. She paper-pieced our sweet penguin stamp in this post HERE. It's a gorgeous layout! So I was excited to try something simpler like my little umbrella friend here. :)


Recipe:


SHARE THIS POST - {PINTEREST}

Wednesday, December 7, 2011

Easy Canvas Prints

Sorry I have been a little slow on getting posts up. I think December will just be slow for me. I need to get my Christmas shopping done before I leave. My husband's family and myself will be off to Idaho for 10 days and there is almost no internet! Anyway, off to get errands done, but I wanted to share this with you! 


-----


So.... I was approached by a company via email to turn one of my photos into a canvas print. Ironically, my husband and I had been talking about this the night before because we still have not put up a single wedding picture in our house. So I decided to go ahead and do it. I was offered a canvas in exchange for a review, but a: I upgraded to a bigger size and paid for the difference myself and b: this review is my own opinion of the product. I was allowed to give any opinion I wanted to and this is mine! :) 


It was SOOO easy! I procrastinated on getting this ordered because I thought it would take me a while to do and I wanted to make sure it was just right... It took me seriously 10 minutes and that included the check out process! I was SO surprised! They really have made it as simple as possible.

It's SOOOO cool! It turns your photos to canvas!


A little story about this photo... On our wedding day we got some BEAUTIFUL photos, but for some strange reason, there are a grand total of 4 pictures (out of 1400) that were JUST my husband and I! All of the other pictures had other people in them. You never stop to think about it on your wedding day! 


Anyway, my friend Jenny from ever whim photographs is a brilliant photographer and I LOVE her style. So within a week of our 2 year anniversary, she graced us with a magical gift - a photo shoot to make up for the pictures we wish we would have gotten on our wedding day. 


So I slipped into my dress (I still fit!) and Hans got in his black suit and down to Point Lobos we went to take some pictures. My hair was down for the wedding except for a ribbon (no, it wasn't crinkled ribbon! haha), but this was the other look I was considering but wasn't sure if Hans would like - the bird cage. So I was thrilled that I got to re-do it! :)


This is one of my favorites from the shoot that day and I just had to have it blown up and put in my craft area. I love that man. 


If you want to check out their Facebook Page, you can click on the link. Apparently if you "like" them you will get 50% off your first order and free shipping! What an awesome deal! 


Thanks for indulging me and for looking at a picture of our ridiculous selves! 


Have a beautiful day! 

SHARE THIS POST - {PINTEREST}

Monday, December 5, 2011

The Magic of Winter

****SCROLL DOWN FOR THE SHOP PUMPKIN SPICE ECHO PARK WINTER LINES BLOG HOP***


Hello everyone! Good Monday Morning! Today over at Imaginisce we are showing you Christmas Card inspiration!!! All week we will be showcasing different Christmas inspiration - gift wrapping, home decor, layouts, etc! It's going to be GREAT! Pop on over to the Imaginisce Blog and check it out! :) 

The picture doesn't really show it, but I stickled around the whole thing as well as the snowflakes which are double popped with foam tape. Oh well! You'll have to use your imagination. :) 


Recipe:


****SCROLL DOWN FOR THE SHOP PUMPKIN SPICE ECHO PARK WINTER LINES BLOG HOP***

SHARE THIS POST - {PINTEREST}

Sunday, December 4, 2011

Shop Pumpkin Spice Blog Hop!


Hello hoppers!!! You should have gotten here from Lenae's blog. If not start HERE at Shop Pumpkin Spice's blog so you can hop through all of the fun and CHECK OUT THE DT CALL!!! You don't want to miss being on this team and come, on... we are SO much fun! :) haha. 


Today we are showcasing the Echo Park Christmas lines!!! I am showcasing Dots and Stripes Christmas! I used two of the patterns on this card and I snuck a little Holly Jolly in there too. :) Hop around to see the inspiration and check out Ann's kit this month which uses the Times and the Seasons line from Echo Park! 


Recipe:


Here is my sneak peek picture of Ann's kit! :) 


Now, head on over to Ann's blog to see what her kit looks like!!!


SHARE THIS POST - {PINTEREST}

Thursday, December 1, 2011

Happy Birthday Dad!

I made this for my dad's birthday card! None of you tell him otherwise he will come and peek! :) His birthday is not until December 17th. We are going as a family to the Sharks game I think! :) We are celebrating a part of his birthday this weekend by going up to San Francisco to see Totem - a Cirque de Soleil performance! I am really really excited!

Anyway, I wanted to participate in the Imaginisce Color Challenge for December. It will be my last color challenge as a member of the DT. :( Aren't the colors beautiful!?! You have all month to participate and they give away about $75 in product!!! It's definitely worth playing for!


Recipe:

SHARE THIS POST - {PINTEREST}

Wednesday, November 30, 2011

Reindeer Card

Good Wednesday morning to you all!!!! I hope you all had a lovely Thanksgiving!!! 

Today I am sharing with you my Shop Pumpkin Spice card! I really like it for some reason and I hope you do too!!! 

The reindeer are embossed. It's kind of hard to see in this photo, but they are swirly. :)


Recipe:


We have our Shop Pumpkin Spice Blog Hop this weekend! The DT call will be officially announced then!

SHARE THIS POST - {PINTEREST}

Tuesday, November 29, 2011

Use your Stickers!

I wanted to keep this little card clean and simple. I made it from some scraps of paper.

The Burlap and Buttercups challenge was to use your stickers! I thought this was a great challenge! Burlap and Buttercups posts one challenge a week and you have the whole month to participate in any of the challenges that you would like to! And you play for great prizes!


Recipe:


SHARE THIS POST - {PINTEREST}

Sunday, November 27, 2011

I Love Spending Every Day With You

Whew! I definitely owe you some inspiration! I put family first this Thanksgiving and had a lovely time visiting with both my husband's parents (my co-parents as I like to call them), my parents, my grandmother, two of my cousins, and Peter (Hans' brother). We had such a lovely time!

Well you are going to get TWO cards today and one tomorrow and the next day! I'm re-vamping! :)

I made this for the Burlap and Buttercups Challenge of Yellow and Grey! All of the supplies with the exception of the ribbon and roses came from their November kit! It hasn't sold out yet so if you like it, you can find it HERE. :)


Recipe:


I also made this for the Cricut Circle Challenge of store-bought flowers. :)

SHARE THIS POST - {PINTEREST}

Thursday, November 24, 2011

Happy Thanksgiving and Imaginisce DT Call!

Happy Thanksgiving to ALL of you out there in bloggy-land! 

I also wanted you to know (short notice, sorry!) that Imaginisce is having a DT call!!! It ends tomorrow so make sure to get your entries in!! I had a FABULOUS time on the DT and loved those girls! While I won't be re-applying in order to make room for something new, I want to encourage all of you to! Cari is the new DT leader and she is ABSOLUTELY wonderful! Check it out HERE!

SHARE THIS POST - {PINTEREST}

Wednesday, November 23, 2011

From the Heart

Hello and I hope you are having a wonderful day or night! 

I wanted to share some inspiration with you that I made using the Lost and Found Two: Blush line! I picked up all the ingredients at Shop Pumpkin Spice. sssshhh... Don't tell anyone, but I happen to know that they are going to have some awesome Black Friday and Cyber Monday sales...

ALSO, they are having a DESIGN TEAM CALL! Check it out HERE for the details, but the final details and the link for submissions will be put up on the blog on December 3rd. 


Recipe:


The card was based on this sketch from Artful Delight:


SHARE THIS POST - {PINTEREST}

Tuesday, November 22, 2011

Easel/Gate Fold Card!

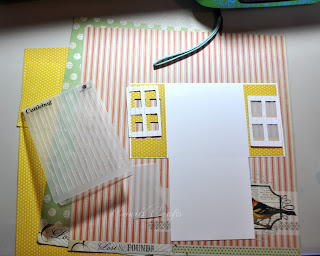
It's the My Pink Designer showcase today over at My Pink Stamper's blog! Head on over there to see what we created! The challenge was a "different fold" card. So I combined a gate card and an easel card to do both. I wanted it to look like windows so I used my Gypsy (I LOVE MY GYPSY) to put window into the card. Here is the picture tutorial on how I did it: 

FYI if you don't have a Gypsy, you can use Cricut Craft Room! Check it out and it's FREE!!! 


My card base was 8.5x8.5" before I cut it, so I did calculations on where I would need the window to go. Then I hid the outside of the window that I took from Kate's ABC's so that only the boxes cut out and not the whole window which would have defeated the purpose.


I taped the yellow polka dots to the white card stock base where I wanted them. Then I put the blade on 6, speed on high, and multi-cut on 2 to ensure that it got through both pieces of card stock. 


This is the windows so that there are frames around the windows. I cut them out of white and embossed them with the Cuttlebug Distressed Stripes Emboss Folder. 


This is what it looked like when I finished cutting it. I actually used the scraps of the 8.5x11" paper to create these. I love using my scraps! 


I cut of the bottom 2 1/8" x 4/25" from each side.


Next I embossed the window frames with the Cuttlebug Distressed Stripes Emboss Folder. I cut velum to the appropriate size and used a liquid glue to put it behind the window frames, but in front of the yellow polka dotted paper. Here you can also see the three patterned papers I had picked out for my inspiration for the project. :) 


I scored the lines appropriately (I can give you these measurements later if anyone wants them). 


I took one of the window pane cut outs (which was a double layer of card stock and therefore pretty sturdy) and put it on the back being careful to only put adhesive on the top half. 


I put a piece of card stock to fit the inside and stamped the sentiment so I could use it for a birthday card. 


Side view of the easel and the gate portion when open.


Front portion after it has been decorated! 


Recipe:


Don't forget to hop on over to My Pink Stamper's blog to see what the other ladies have done with this challenge! :) 

SHARE THIS POST - {PINTEREST}

Monday, November 21, 2011

Thanksgiving Wine Bottle

This week over at the Imaginisce Blog we were asked to inspire you with Thanksgiving ideas! I chose to decorate a wine (or sparkling cider for our non-drinking friends) bottle as a thank you gift for someone who is hosting. 

We are also showcasing the i-Top 2.0 in each and every one of our projects! I have to tell you, I LOVE LOVE LOVE the 2.0!!! The improvements they made were SO thoughtful and exactly what we all wanted! I know you spent money on the i-Top 1.0 (I did too), but I have to say - UPGRADE! It is WELL worth the money. You will LOVE the changes. The grip is more ergonomic (it's closer together for those of us with little hands), it's lighter all together and now both pads have rubber so nothing slides around! I am very very impressed! 

Here is my project:


 I tried to d-stress the Kraft-Core on the i-Top Brad so that it looked like worn leather. I like the effect. :) 

Recipe:


SHARE THIS POST - {PINTEREST}

Sunday, November 20, 2011

Blog Hop Winner!

Whew! Sorry this is so late! A big thank you to Laiony for reminding me about it! It's been a busy weekend. I did get a new car though which is always exciting! I've been saving up -riding the bus for 3.5 years- and now I finally have my own car! I will have to get pictures. :) I love it. 

Anyway, stop back by in a couple hours to see a super cute project for Imaginisce using the brand new iTop2.0! I LOVE it! 


I am SOOO excited for my sweet friend Lezlye! I met her at a Crop for the Cure event that Monique Griffith and Wendy Lawrence put on and then again at a Circlet meet-up. She is just delightful and one of my biggest cartridge enablers! :)  She even came to my house a while ago so we could craft together! Go check out her blog HERE. She posts something new almost every day! 

SHARE THIS POST - {PINTEREST}

Thursday, November 17, 2011

You Make My Rainy Day Bright


I. Also. Love. 3 Birds On Parade.

Haha! I'm SO sorry if two of the chubbiest cute blue birds in a row are too much, but I just love them! This was actually the first card I made and I made it for Shantaie

I won her blog candy which was 3 Birds on Parade and I have been having a lot of change going on in my life and it's been pretty hard on me. I'm a creature of habit. Husband got new job, new car (that's the fun part), moved out of our house in 5 days flat... just a lot for me. I know that we're right where we are supposed to be and change is sometimes hard, but there is SOOO much to be thankful for EVERY day. And when I won that blog candy I teared up and I wanted to let her know that on a rough day, her generosity was the thing that made me smile from ear to ear. 

Everything on this card came from Shop Pumpkin Spice except for the crinkled ribbon.

This also might be one of my favorite cards I have ever made.

Recipe:


ALSO, SHOP PUMPKIN SPICE now has Echo Park Times and Seasons, WINTER PARK, AND STYLE ESSENTIALS in stock and ready to ship for ridiculously good prices! Check it out!!!


Have a BEAUTIFUL day! 


SHARE THIS POST - {PINTEREST}

Wednesday, November 16, 2011

Blue Bird Santa

Hello and welcome to the product swap with Glue Arts and Imaginisce!!! We were super blessed to receive some product from them and I used everything they sent me in this project! THANK YOU GLUE ARTS!


I was surprised how much I liked the "Raisen's". Since they were clear they really disappeared and gave just a slight amount of dimension. I really liked it! 


 Hmm... This one didn't show up as ell as I wanted it to. It's the Glue Glider Pro on the white, but I guess that's a good thing! It's invisible! :) 


Well, you all know how much I love Extreme Adhesive Squares so I was jumping up and down when these were attached to the back of a Glue Glider refill! I loved them!!!


 I just wrapped the extra back onto the clothespins and they were AWESOME at sticking to my paper! Very impressive for something so small! 


Finished product. I just love this little fat blue bird! He's SOOOO cute!


The U-Cut-It foam is really tall. Which is awesome because I LOVE the dimension it brings. It made his fake beard really look like he had just added it to his face! FUN! 


Recipe:


Be sure to hop on over to Imaginisce and then to Glue Arts to see what we have all made for your inspiration! I hope you enjoy! There are prizes up at BOTH locations! :)

SHARE THIS POST - {PINTEREST}
 
SITE DESIGN BY DESIGNER BLOGS